
A new commission to embroider a lovely Cotswold House! This will be my first building so it's going to be a challenge!
This blog describes the first part of my journey to the completion of this highly textured textile artwork.

I considered different views of the house but it was impossible to improve the Estate Agent's photograph! I began by tracing the layout from this view as it was probably the best view that I was going to get. I then scanned the tracing so I could enlarge it to the actual size I would be working on. The enlarged version resulted in very blurry lines but at least I had accurate proportions to start with. This was taking much longer than expected!
The enlarged outline was then traced again and then transferred onto the wrong side of iron on interfacing – remembering to make sure it was in reverse when I came to ironing it onto the back of the background fabric!


Now for the straightforward part - or so I thought. Different natural fibre fabrics were pinned onto a cotton base. They included cotton, linen and silk, plus some lace, for a variety of texture. This would be my collaged background. I later realised that I had forgotten to pin this base onto a larger piece of fabric to create a border. I don’t know why I forgot as I’d always done this before!
The layered fabrics were then stitched down which took ages! I tried to place different fabrics in appropriate places, particularly where the house would be. The traced outline was then ironed onto the back in reverse.


The outline of the house and main garden elements was stitched from the back so it showed through to the right side. This gave me an idea of where each part of the house and garden was.
3D medium was then added to different areas of the collage to create further texture. This had been coloured with Brusho before being applied and heated with a heat gun. I also added a bit of horticultural fleece but this just disintegrated under the heat!
Colour was then applied. I used very diluted screen printing ink (as I had done in previous work) which was brushed on to a very wet background so the colours all blended together. I just needed to block in the sky, house, and foreground. The outline was helpful in placing the colour. However, it was soon clear that the placement of raw silk in the sky was not a good idea! It was too absorbent and later had to be removed. The work was then heated with a hair dryer/heat gun to set the colour.


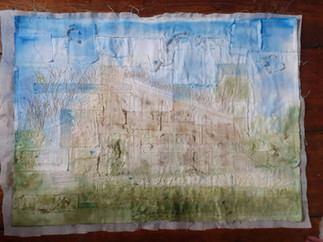
Outlines of tree branches were then added to the background. It took a very long time to build up the trees – and this was only the start! I’m glad I was able to visit the property to take my own photos as it would have been impossible otherwise. Numerous layers of zig-zag and straight stitching were used to build up the colours. I also used dark silk fibres for the shadows and to give some depth. This was very much a case of trial and error to get the rights colours and textures and was going to take a lot longer than I thought!


I felt that I needed to removed some of the stitching behind the chimney as it was too high. Unfortunately this made the green patch even more obvious! I’m going to applique the roof and chimneys on top so no need to worry about straight edges.
More stitching in lighter colours was used to bring out the foreground of the trees. This seemed to work really well although it was still very much a case trial and error! And a lot of luck! Any mistakes take forever to unpick! It's generally better to stitch again on top but this also adds to the thickness of the work.
A little bit of orange colour was added to the annex roof as a base for stitching, and a brickwork texture was machine stitched onto the left wall of the house. The orange wall was then filled in using free-machined straight stitch.
Time to start building up the front wall! This proved to take a very long time. It was difficult to get the texture and the colours needed. The colour in the photographs that I had taken were all very different depending on what time of year and day it was! I spent quite a long time experimenting with the decorative machine stitches that I had on both machines. The Rose machine seemed to be the most useful – it’s generally better for free-machining anyway as it has a clear darning foot. I need to try and find a similar one for the Bernina.
The stonework took layers and layers of building up to get right using different shades of cream, tan and a little grey. I tried to avoid the windows as these areas would be covered over.
The collage base of the house was gradually disappearing under all of the stitching. In hindsight it may have been better to applique the whole house on after I had created the texture, had I known how much stitching I needed to do. The amount of stitching was making the fabric very thick. I would be stretching it out when finished but I was concerned about how much the stitching was pulling the fabric out of shape.


I then started to build up the foliage on the far right, and stitched the roof tiles of the annex. I also tackled the greyish roof on the left side of the house by using a small amount of black chiffon as the base and stitching the tiles on top, but they didn’t seem to show up enough and the roof was too dark. I later brushed on a little dry acrylic white paint which helped to highlight the light on the tiles.
Most of the collaged base was now covered in stitch but I think it still added to the texture of the house in many areas.


The next stage will be the application of the windows, which will be covered in Part 2! Go to https://www.suebatemantextiles.com/post/cotswold-house-part-2
Join my Mailing List for the latest news, products and offers, plus a 20% discount off of your first order! SUBSCRIBE NOW
#textileaart #natureart #suebatemanartist #suebatemantextiles #machineembroidery #natureart #cotswoldhouse
Comments